Basic Zoom Meeting Controls
Learn the basics of the Zoom controls.
On this page:
Audio
Use your computer audio
When starting/joining a meeting, you are presented with the choice to join the audio by phone or computer. We encourage everyone to choose Join with computer audio when you join the meeting.
Choose computer audio source
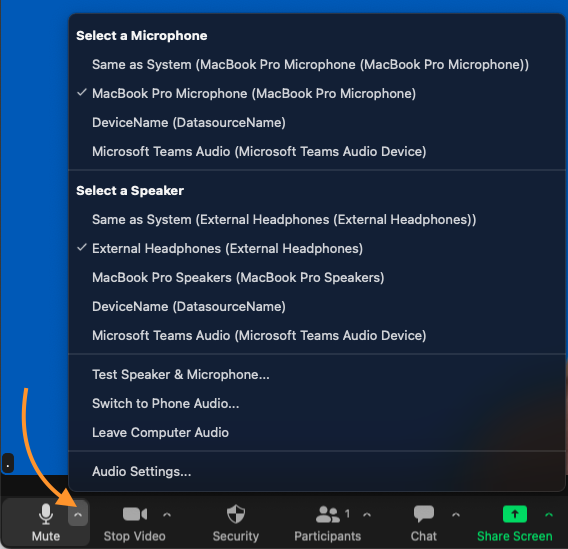
To tell Zoom which of your connected microphones or speakers to use during a meeting, click the caret next to the microphone icon in the lower left of the meeting window and select the desired device for both your microphone and speaker:
Mute / unmute your audio
Clicking on the microphone icon will let you mute and unmute your audio once connected.
Test your audio
- When joining a meeting, choose Test Computer Audio
- At any time, click the caret next to the microphone icon > Audio Settings...
- Test your speaker and mic and select a different device if necessary
Advanced Audio Settings
In Audio Settings you may adjust Background noise suppression options. Also, musicians using Zoom for music instruction or performance may want to explore the options for Original sound for musicians and Live performance audio. See also: Configuring audio for music and singing.
Video
Set up your video
Access video settings before or during a meeting by clicking on the Settings icon on your Zoom Desktop Application. On the Video tab you can preview and change your camera source via the down arrow.
Mute video
Clicking on the Stop Video icon in the lower left of the meeting window will let you start and stop your video feed.
Share screen
By default, screen sharing is set to Host Only. This allows the host, or co-host(s), to share their screen. During screen sharing you and your attendees can use the Annotation tools for drawing, pointing, highlighting, etc.
To share your screen in a meeting
- Click Share Screen
- Choose to share your: desktop, specific application, whiteboard or camera feed
- Optional: tick Share sound if you plan to share a recording such as a YouTube video during your screen share
To permit others to share their screens in the current meeting you are hosting
- Click the arrow to the right of the Screen Sharing icon
- Select Advanced Sharing Options
- Select All Participants

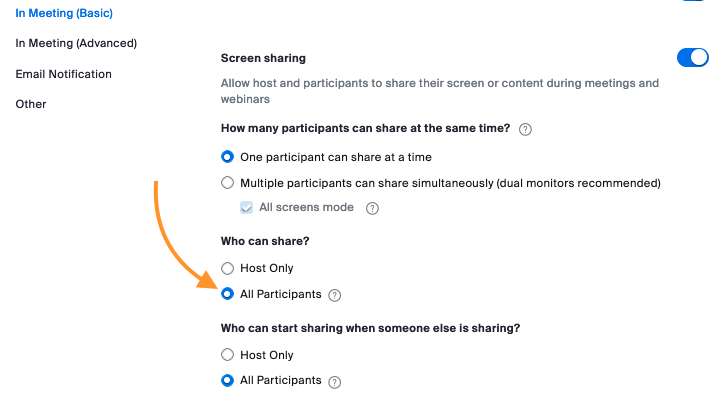
To permit others to share their screens by default in any meeting you host
- Sign into the Zoom web portal > Settings https://buffalo.zoom.com/profile/setting
- Select In Meeting (Basic)
- Scroll down to Screen sharing
- Under Who can share? select All Participants
- Click Save
In the web portal you can also control annotation, whiteboard and remote control settings.
Allowing a participant to share a screen with the host but not all participants
Open a breakout room and assign that student to the room and join them there. See How to manage breakout rooms in a meeting
Depending on the situation, you can also use All screens mode to see the desktop of every participant (except host/co-hosts) without them seeing the desktops of anyone else. See Using all screens mode in meetings.
Host and co-host controls
Host controls are located at the bottom of the Zoom meeting screen. These controls allow you to manage the meeting and participants. See Using host or co-host controls in a meeting.
When you share your screen, the host controls move to a floating toolbar that you can move or hide.
Co-hosts can assist you in managing the meeting and have access to almost all of the same controls. See Enabling or adding a co-host.
Arranging the windows during a meeting
Use the View menu to manage how you see participants’ videos and screen sharing. See Adjusting your video layout during a meeting.
When you share your screen you can move the video panel and floating meeting controls out of your way or go to the More menu and choose Hide floating meeting controls and/or Hide video panel. Press Esc to see the controls again.
To facilitate screen sharing, open any programs, files, or websites you plan to share during your meeting. Close programs you won’t need to reduce distracting notifications, reduce the processing load on your computer, and make it easier to locate items you want to share.
Allowing others to advance PowerPoint slides when a person shares their PowerPoint or Keynote presentation
Use either of these guides to learn how to grant control, and how to control the slides:
- Zoom article: Controlling slide shared by another participant
- Zoom video: Slide Control for Zoom Meetings and Webinars
Chat
Start chatting
- Click Chat to start an in-meeting message with participants in the meeting
- If enabled, the dropdown on the chat window will allow you to message Everyone, or send a private message to a specific participant
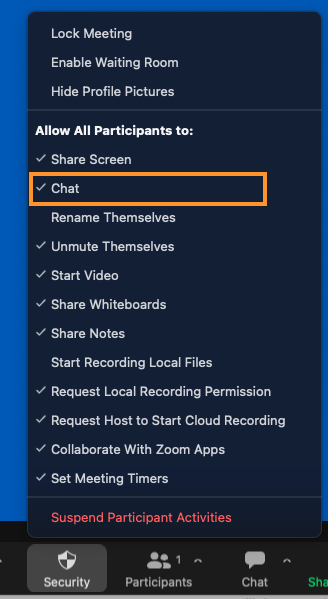
Enable or disable chat during a meeting (host or co-host)
During a meeting the host or co-host can click the Security button to disable or enable chat for participants.
Choose who can chat with whom in chat settings.
- Open the chat window
- Click the three-dot More menu
- Choose your desired option

Note: If Chat has been disabled by the host in their web portal settings, neither the host nor participants will be able to chat in the host’s meetings.
Saving chat messages
Auto saving chats enabled by default
By default, Zoom saves chats automatically on the host’s computer (or the computer from which the host joins the meeting).
- The saved chat includes messages sent to everyone and messages sent privately to the host.
- Participants in a meeting can save chat by default; a host can disable this setting. Chat saved by a participant includes messages sent to everyone in the meeting and messages sent privately to that participant.
- Chat saved along with a Zoom cloud recording only includes messages sent to everyone; it does not include any private chats.
Enable or disable chat auto save (host)
- Sign in to the Zoom web portal
- In the navigation panel, click Settings
- Click the Meeting tab
- Under In Meeting (Basic), click the Meeting chat - Auto-save toggle to enable or disable it
Save a chat manually
- During the meeting, click the three-dot menu in the chat window
- Click Save Chat
Q & A in a meeting
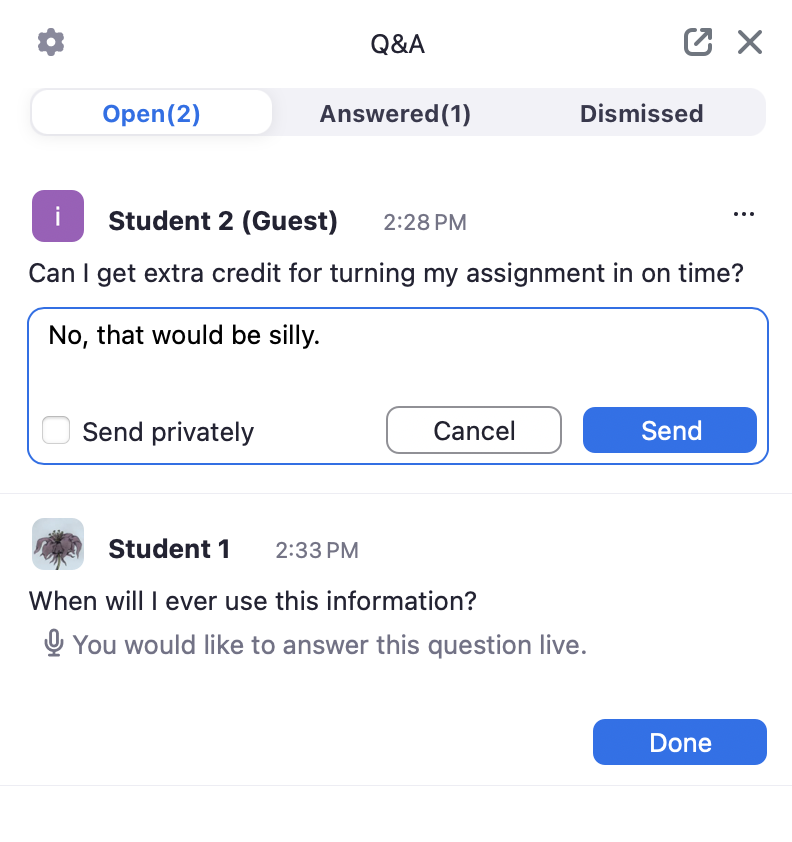
The Q&A panel provides an orderly method of collecting and responding to questions during a meeting. Previously only available for webinars, Q&A gives participants a place to ask questions where the host and co-hosts can answer via a public or private text message or mark the question as answered live. The host can see which questions have been answered and which still need attention.
Focus mode
By enabling Focus Mode, both the host and co-hosts can see all attendees with video on. However, the attendees can only see the host and co-host, with video on, everyone else appears as a black screen and corresponding name.
To apply this feature before a meeting, open options and click Enable Focus Mode when meeting starts. If you want to apply this feature after a meeting begins, click on the 3 dots (More) menu, and select Start Focus Mode.
Common Questions
How do I know if someone has sent a chat while I’m teaching? Is there a sound notification?
There is no sound notification for in-meeting chat messages or Q & A questions. If you receive new chat messages while screen sharing, a red icon will appear on the floating meeting controls, next to the Chat icon indicating the number of unread messages. Click Chat to open the chat window. A floating chat window will appear, which is not visible to other online meeting participants, but may be visible to people in the classroom if you are teaching a hybrid class.
If you hid the floating meeting controls you will need to make them visible again (press Esc), or stop sharing, to be aware of any chat notifications.
How do I exit full screen mode?
Press the Esc key
How do I conduct a vote or a quiz?
How do I use the thumbs-up and raised hands features?
Need help? Contact the UBIT Help Center or your departmental IT support.